
You heard of FL Studio and how it is an awesome sequencing program so you decided to take the plunge and buy it. You fire it up and realize, “I have no idea where anything is or how it works.” Well thankfully for you my friend we are going to cover the FL Studio’s mixer from head to toe and to operate it with lightning speed! If you are ready to get mixing then dive on in!
Before we can begin to tackle the ins and outs of the mixer (literally), we first need a good understanding of the mixer’s layout and how the different sections function. What we need is a map. However, a map doesn’t do us much good if we don’t know where to find it in the first place! Here are two simple ways to access the mixer inside FL Studio…
- The easiest way to access the mixer is by pressing the shortcut F9. This will hide and show the mixer from its last location on the screen.
- If you are more of a button person, simply click the mixer icon on the tool bar at the top of the screen.

Now that we have the mixer window available to use, lets briefly analyze the different major sections and get an idea of what they are all about…
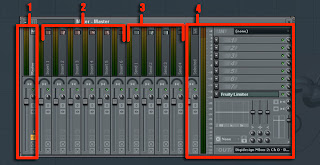

- This is your master channel for FL Studio. Ultimately, all of your audio that you will pass through this fader before going to your speakers or headphones.
- These are your general workhorse channels inside FL Studio. Each of your instruments, synths, samples, etc. will most likely pass through one of these tracks. While I am only showing a few here, you can have up to 99 of these tracks in a given project.
- These are your auxiliary send tracks inside FL Studio. These tracks function almost exactly the same as your standard tracks except that they are meant specifically for either FX processing or additional audio outputs. Why you ask? One such example would be a reverb channel for your whole mix instead of having the same plugin on every single channel.
- This final section sort of the dynamic area of FL Studio’s mixer. As you select different channels this section will reflect more information about that channel such as effects, larger peak meter, etc.
With these larger sections in mind, lets delve deeper the working of the mixer.
Generally speaking you will always want your tracks to send to the master channel except in cases where you want to send multiple tracks to a buss before they go onto the master. For the sake of example let’s see how we would buss multiple tracks to one track before going to the master.
- With your synth track still selected you will notice the Send1,2,3,4 tracks also have gain knobs.
- Turn off the master send gain (click the yellow arrow in the master channel) and turn up your synth tracks gain knob into Send1
What you essentially are doing is sending the output of your synth track to Send1, and then Send1 will go to the master channel. You might yourself be asking, “But why?” Well think of it this way. Say you have all your different drums each on their own separate track and your drum mix is perfect; except for the fact that it is too loud. Do you want to risk manually turning down every drum track proportionally? Or would you rather turn down your Drum Buss fader on Send1, which in turn will turn down the overall volume of every drum while leaving your drum mix itself untouched? Sounding pretty good right now isn’t it?
Finally lets look at one last related feature called side chaining. Side chaining a process by which we use one channels audio to control another channels plugins. If you have ever heard the pumping effect in a trance track then you have heard someone use side chaining. I won’t dive into specifics, but if you want a plugin to recognize another mixer track for a side chain here is what you do…
- Select the track you wish to control the side chain plugin (our synth track for example).
- Activate the send from your synth track into the channel with the side chaining plugin. To do this simply click the grayed out upward arrow on the destination track.
- Next turn the gain knob on the destination track all the way to 0.
Now at first glance this may seem a little strange, especially if you are coming from a DAW such as Pro Tools. Essentially what we are doing is sending our track to another channel like normal, but we are turning the volume down to 0. In FL Studio, when the send gain is at 0 it treats it as a side chain instead. From here you should be able to select your Synth track inside a side chain plugin. Like I said earlier FL Studio has some odd quirks and this is by far one of the more prevalent ones.
1. Do you put each instrument to separate mixer track in FL studio? Is it a best practice? I read somewhere it is good to this way because you can control fader effectively on mixer than volume knob on each instrument?
2. Also, when do you put limiter or compressor on master track? At the time of mixing of when you’re equalizing and putting all the effects or mastering?
3. How do you know if the final volume of track is good enough before rendering the track?
4. Also, read somewhere, first mix all instruments and render them to wav and then create another project put your vocals and instrument wav and mix them. Then again render this mix to wav and create another master project to create your master? Is that right?
ANSWERS ARE
1. YES PUT THE INSTRUMENTS IN SEPARATE TRACKS.. BUT SOMETIMES IF YOUR COMBINING SOUNDS OR DRUMS PUT THEM IN THE SAME MIXER TRACK.. SO YOU COULD MIX THEM TOGETHER..
2. PERSONALLY I DO IT AFTER I MAKE THE BEAT.. I PUT IT ON.. THEN MIX THE SOUNDS AFTERWARDS...
3. EARS.?
4. I DON'T KNOW ABOUT ALL THAT..
No comments:
Post a Comment